Startechcom SV841DUSBI User Manual
Browse online or download User Manual for Computer Accessories Startechcom SV841DUSBI. StarTech.com SV841DUSBI User Manual
- Page / 52
- Table of contents
- TROUBLESHOOTING
- BOOKMARKS
Rated. / 5. Based on customer reviews
Manual Revision: 06/20/2014
For the most up-to-date information, please visit: www.startech.com
DE: Bedienungsanleitung - de.startech.com
FR: Guide de l'utilisateur - fr.startech.com
ES: Guía del usuario - es.startech.com
IT: Guida per l'uso - it.startech.com
NL: Gebruiksaanwijzing - nl.startech.com
PT: Guia do usuário - pt.startech.com
SV441DUSBI
SV841DUSBI
4 / 8-Port Enhanced Digital USB KVM Switch
Over IP with File Transfer
*actual product may vary from photos
- Over IP with File Transfer 1
- FCC Compliance Statement 2
- Table of Contents 3
- Introduction 6
- Front View 7
- Rear View 8
- Installation 9
- Operation 9
- Instruction Manual 10
- Mouse Setting (optional) 11
- Using the Web Interface 12
- Web Interface Introduction 13
- Main Menu Selections 13
- File Transfer 14
- Network Conguration 16
- User Accounts 17
- System Identication 18
- Security 18
- Compatibility 19
- Serial Ports 20
- Time / Date 20
- Firmware 20
- Port Numbers 22
- Help Menu 22
- Site Map Menu 22
- Copyright Menu 22
- Accessing the VNC Interface 23
- Native VNC Client 24
- Using the VNC Menu 25
- Main Menu 26
- VirtKeys Menu 28
- Video Tuning menu 28
- Optimizing video performance 31
- Accessing KVM Features 32
- Data-Transfer Rule 33
- OSD Operations 34
- OSD Function Keys 34
- Function key <F4> 35
- Auto Scan 35
- Manual Scan 35
- Scan Type 35
- Scan Rate 35
- Hot Key Commands 36
- Changing Your Conguration 37
- Using the Modem feature 38
- Modem conguration 39
- Accessing the Web Interface 41
- Modem Troubleshooting Guide 42
- Background 42
- Remote Login via SSH 44
- Operating Notes 45
- Is my data safe? 45
- Installing the New Certicate 46
- Troubleshooting 47
- Linux X-Window environment 48
- Supported Protocols 49
- Specications 50
- Technical Support 51
- Warranty Information 51
Summary of Contents
Page 1 - Over IP with File Transfer
Manual Revision: 06/20/2014For the most up-to-date information, please visit: www.startech.comDE: Bedienungsanleitung - de.startech.comFR: Guide de l&
Page 2 - FCC Compliance Statement
Instruction Manual5Select the “Network Setup Wizard” and press <Enter> to go to the next menu.The IP KVM can have its IP address assigned dynami
Page 3 - Table of Contents
Instruction Manual6Mouse Setting (optional)Many operating systems oer a feature called mouse acceleration that allows the user to adjust the responsi
Page 4
Instruction Manual7Using the Web InterfaceThe Web interface is the most intuitive way to congure the IP KVM Switch, oering a Java-based VNC client t
Page 5
Instruction Manual8Web Interface IntroductionAfter the initial login screen, the screen is divided into several sections, a number of which will remai
Page 6 - Introduction
Instruction Manual9Snapshots: The Snapshots screen allows you to view and save a screenshot of the controlled computer in its current state. This scre
Page 7 - Front View
Instruction Manual10emergency repair disks are often oppy-based etc.). You can transfer bits from that oppy to the IP KVM (use the upload disk image
Page 8 - Rear View
Instruction Manual11If the host computer’s BIOS supports USB boot devices, it is possible to boot from the emulated CD-ROM or oppy - allowing complet
Page 9 - Operation
Instruction Manual12Clicking the Commit button applies any changes made on this page, but leaves the old settings active until the next time the unit
Page 10 - Instruction Manual
Instruction Manual13System IdenticationMachine Name: This is the name that is used to uniquely identify this machine. You may wish to create a DNS en
Page 11 - Mouse Setting (optional)
Instruction Manual14CompatibilityThe Compatibility menu oers features that may provide enhanced functionality with certain KVM and power products, su
Page 12 - Using the Web Interface
Instruction ManualFCC Compliance StatementThis equipment has been tested and found to comply with the limits for a Class B digital device, pursuant to
Page 13 - Main Menu Selections
Instruction Manual15ModemEnable this to allow the modem to answer the phone and start a PPP connection. Enable modem connections (PPP) via serial port
Page 14 - File Transfer
Instruction Manual16Auto Self Upgrade: The IP KVM unit includes an innovative feature allowing it to upgrade itself over the internet. Simply click on
Page 15
Instruction Manual17StatusThe Status screen displays a system security log, various system settings, and the ability to generate a copy of the system
Page 16 - Network Conguration
Instruction Manual18Using the Terminal Interface via Serial PortThe terminal interface can be accessed via the serial port (or through SSH using the s
Page 17 - User Accounts
Instruction Manual19Socket Layer) encrypted link that encrypts all data from the session, including the actual video pictures.Because Java is consider
Page 18 - Security
Instruction Manual20• The port number “15900” is arbitrary in the above example and can be any number (1025...65535). It is the port number used on y
Page 19 - Compatibility
Instruction Manual21• KVM: Sends the KVM “hotkey” sequence. This function is only enabled when you have congured the unit to expect a particular bra
Page 20 - Firmware
Instruction Manual22The main menu window may be moved by clicking and dragging on the title bar. It can be closed by pressing Escape, or by clicking o
Page 21
Instruction Manual23VirtKeys MenuClicking any button in the top half of the window simulates pressing and releasing the indicated key. In the bottom a
Page 22 - Copyright Menu
Instruction Manual24Color Oset is a ne tuning adjustment that requires the use of a test pattern. There is a copy of the test pattern available on t
Page 23 - Accessing the VNC Interface
Instruction ManualiTable of ContentsIntroduction ... 1Packagi
Page 24 - Native VNC Client
Instruction Manual25the values. Note that any previous settings assigned to that button will be lost. If you do not wish to save the presets after cli
Page 25 - Using the VNC Menu
Instruction Manual26Optimizing video performanceChoose the best video mode• We recommend using 60Hz refresh rate and 1024 x 768 resolution. Using a s
Page 26 - Main Menu
Instruction Manual27Accessing KVM FeaturesOnce you can access and congure the networking component of the Server Remote Control, you can use it to se
Page 27
Instruction Manual28To access additional menu functions, press the <F4> key. A new screen will appear displaying more functions, as shown below.
Page 28 - Video Tuning menu
Instruction Manual29OSD OperationsBy hitting the left <CTRL> key twice within two seconds, you may see the ‘Hotkey Menu’ (unless disabled throug
Page 29
Instruction Manual30<F3> then enter the password. If you want to access the locked device temporarily, simply highlight it and press <ENTER&g
Page 30
Instruction Manual31Hotkey MenuWhen you hit the left <CTRL> key twice within two seconds, the Hotkey Menu appears displaying a list of hot-key c
Page 31 - Optimizing video performance
Instruction Manual32Selecting a ComputerTo select a computer by hot-key command you need to know the device’s channel address, which is determined by
Page 32 - Accessing KVM Features
Instruction Manual33Using the Modem featureBackgroundThe modem feature allows the IP KVM to act as an Internet connection server for increased securit
Page 33 - Data-Transfer Rule
Instruction Manual34with the modem or the IP KVM, but simply reect the line conditions at the time the connection is made. The Serial port can be use
Page 34 - OSD Function Keys
Instruction ManualiiFirmware ...
Page 35 - Scan Rate
Instruction Manual35Conguring the Remote ConnectionThis section describes how to congure a typical Windows dial-up session to access the modem conne
Page 36 - Hot Key Commands
Instruction Manual36Accessing the Web InterfaceOnce a dial-up connection has been established, you can access the Web interface or start a VNC session
Page 37 - Changing Your Conguration
Instruction Manual37Modem Troubleshooting GuideThe following messages will appear in the system log on the Status screen in the Web interface and may
Page 38 - Using the Modem feature
Instruction Manual38Connecting Serial Remote Control ModulesThe cable for each serial device is similar to a phone cable and uses an RJ-14 connector.
Page 39 - Modem conguration
Instruction Manual39device will logout and reset itself if the carrier signal is lost, increasing security. Note that this may not work with all devic
Page 40
Instruction Manual40command. To quit the menu, press <Q> on the keyboard when the menu is active. These commands are not sent to the device you
Page 41 - Accessing the Web Interface
Instruction Manual41Can I prevent the warning from occurring?Yes. You have two options that may prevent the warning from occurring. First, if the Web
Page 42 - Background
Instruction Manual42TroubleshootingForgotten master password.You can reset the master password using the serial interface on the unit. Use the S comma
Page 43
Instruction Manual43Mouse performance is erratic when using the GNOME or KDE desktop in a Linux X-Window environment.The mouse controls in GNOME and K
Page 44 - Remote Login via SSH
Instruction Manual44Supported ProtocolsService Description BenetSSH Secure ShellMay be used to securely “tunnel” VNC and HTTP protocols.HTTPWeb Redir
Page 45 - Is my data safe?
Instruction ManualiiiAccessing the Web Interface ...
Page 46 - Installing the New Certicate
Instruction Manual45SpecicationsSV441DUSBI SV841DUSBINumber of Ports 4 8Console Connectors1 x DE-15 VGA female2 x USB type A female1 x RJ45 Ethernet
Page 47 - Troubleshooting
Instruction Manual46Technical SupportStarTech.com’s lifetime technical support is an integral part of our commitment to provide industry-leading solut
Page 48 - Linux X-Window environment
Hard-to-nd made easy. At StarTech.com, that isn’t a slogan. It’s a promise.StarTech.com is your one-stop source for every connectivity part you need.
Page 49 - Supported Protocols
Instruction Manual1IntroductionThank you for purchasing a StarTech.com IP KVM Switch with USB Console. The SV441DUSBI / SV841DUSBI revolutionizes remo
Page 50 - Specications
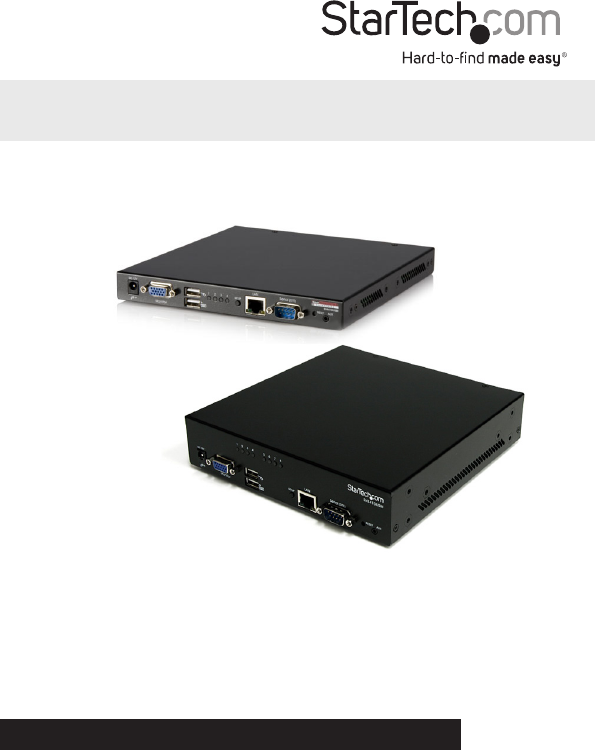
Instruction Manual2SV441DUSBISV841DUSBIFront View1234567812 345 6781. DC Power connector2. DE-15 VGA connector (Local Console monitor)3. USB Keyboa
Page 51 - Warranty Information
Instruction Manual3SV441DUSBISV841DUSBIRear View1231231. R-Port connector2. USB Hub connectors3. Computer Port connectorsLED Color DescriptionGreen
Page 52
Instruction Manual4InstallationDevice Connection1. Connect the USB keyboard, mouse, and VGA monitor to the console connectors on the IP KVM Switch.2.
Related products and manuals for Computer Accessories Startechcom SV841DUSBI
 (12 pages)
© 2020, manymanuals.com. All rights reserved. | 0.078 s |
 Manymanuals.com
 Manymanuals.de
 Manymanuals.fr
 Manymanuals.it
 Manymanuals.pl
 Manymanuals.cz
 Manymanuals.es
 Manymanuals-pt.com
Comments to this Manuals